1. Setup
This tutorial guides you through the processes and settings for installing the required software and packages for the ACon Sumo openCV programm.
1.1. Installing the required software
Install the following software on your computer
- Microsoft Visual Studio 2017 Community Edition
- Cmake Gui (Version 3.9.1 or higher)
- QT (Version 5.9.x or higher) (you need to create a free Account)
1.1.1. Microsoft Visual Studio 2017 Community
During the installation process, select Desktop Development with C++ (Desktopentwicklung mit C++)

After installing, add Visual Studio Compilers to your paths. You may need to restart your computer afterwards or just kill the explorer.exe task in the task manager and execute explorer.exe again.
Tip
On Windows 10, go to Settings, click on System. Then on the left side click About and select System info at the bottom or at the top right hand side. In the new Control Panel window that opens, click Advanced system settings on the left. Now in the new window that comes up, select Environment Variables... at the bottom.
Now select Path and System variables and click Edit and then New. Add the path to the bin folder. For example:
C:\Program Files (x86)\Microsoft Visual Studio\2017\Community\VC\Tools\MSVC\14.x.x\bin
1.1.2. QT Open Source
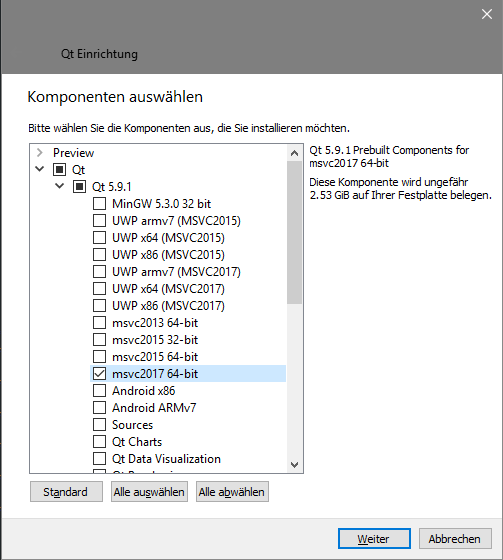
During the installation process, make sure you have msvc2017_64 selected. You can uncheck every other component to save space.
1.2. Download openCV source files
1. Download openCV master source files. Either download the .zip file from https://github.com/opencv/opencv or checkout using Git
https://github.com/opencv/opencv.git
2. Download openCV contrib modules. Either download the .zip file from https://github.com/opencv/opencv_contrib or checkout using Git
https://github.com/opencv/opencv_contrib.git
It is recommended to use a folder structure similar to this:
-- opencv
    |- build
    |- opencv-contrib
    |- opencv-master
Unzip the downloaded source files to their respective folder.
1.3. Create your own openCV Build
Start Cmake Gui
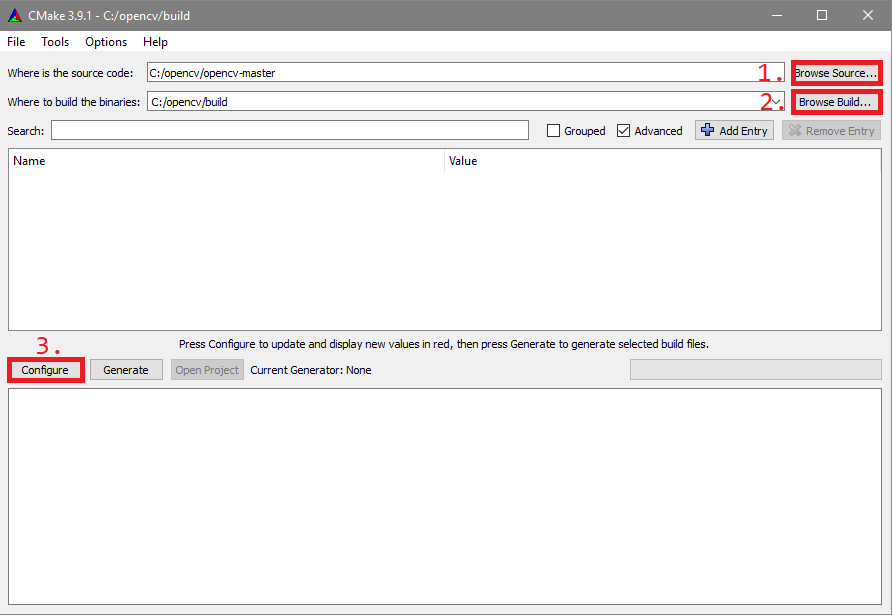
- Click Browse source... and locate
opencv-masterfolder - Click Browse build... and locate
buildfolder - Press Configure
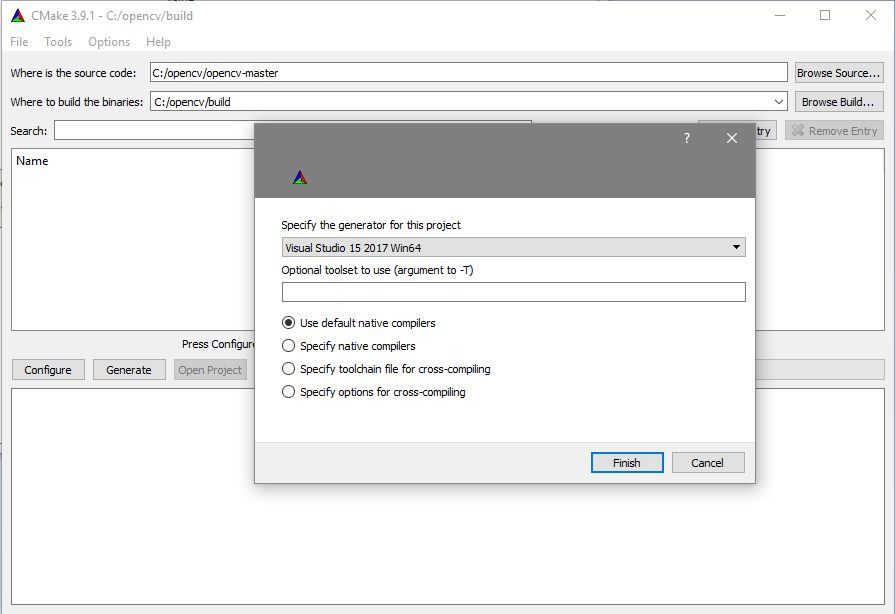
- Select the Generator. For example
Visual Studio 15 2017 Win64and selectUse default native compilers - Press Finish
Note
This only works if you added the correct Path to your Environment Variables. If you get an error, check the Microsoft Visual Studio 2017 Community Section again.
- After configuration is done, it should look similar to this
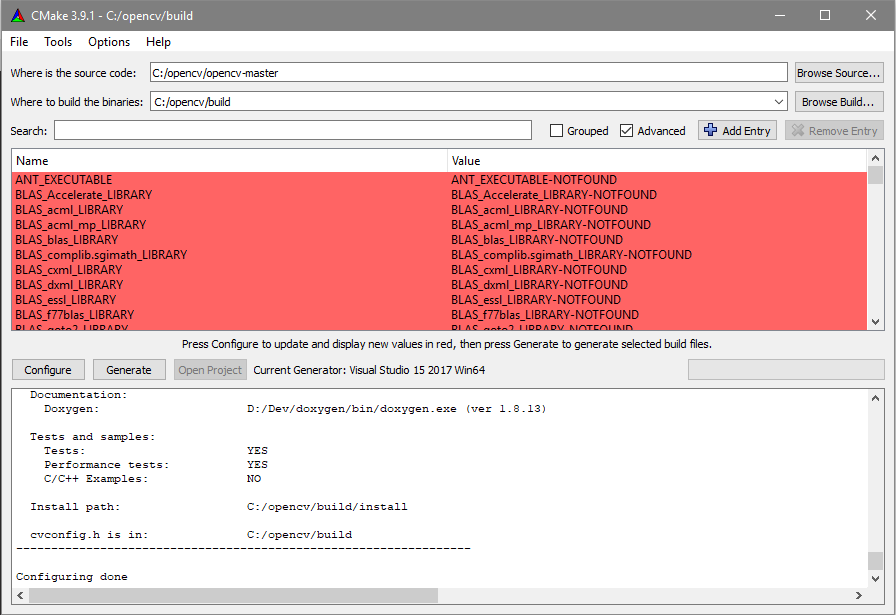
- Now you need to specify the following values (Use search function)
| Name | Value |
|---|---|
| OPENCV_EXTRA_MODULES_PATH | path to modules, eg: C:/opencv/opencv-contrib/modules |
| OPENCV_ENABLE_NONFREE | ENABLE |
| BUILD_DOCS | DISABLE (optional, greatly reduces build time) |
- Press Configure again. New values are displayed in red.
| Name | Value |
|---|---|
| BUILD_opencv_aruco | ENABLE |
| BUILD_opencv_ccalib | ENABLE |
| BUILD_opencv_xfeatures2d | ENABLE |
| BUILD_opencv_contrib_world | DISABLE |
| WITH_QT | ENABLE |
- You’ll get the following error
Error
Error in configuration process, project files may be invalid.
This is normal. You have to specify the QT5 paths. For this, you have to search inside your QT installation folders. It is assumed that you installed QT in C:/QT/5.9.1. Please set it according to your installation folder:
| Name | Value |
|---|---|
| QT_QMAKE_EXECUTABLE | C:/QT/5.9.1/msvc2017_64/bin/qmake.exe |
| Qt5Concurrent_DIR | C:/QT/5.9.1/msvc2017_64/lib/cmake/Qt5Concurrent |
| QT5Core_DIR | C:/QT/5.9.1/msvc2017_64/lib/cmake/Qt5Core |
| QT5Gui_DIR | C:/QT/5.9.1/msvc2017_64/lib/cmake/Qt5Gui |
| QT5Test_DIR | C:/QT/5.9.1/msvc2017_64/lib/cmake/Qt5Test |
| QT5Widgets_DIR | C:/QT/5.9.1/msvc2017_64/lib/cmake/Qt5Widgets |
Note
If you don’t have the msvc2017_64 folder, check the QT Open Source Section again.
- Press Configure again. It’ll show a new error and ask for the
QT5OpenGL_DIR
| Name | Value |
|---|---|
| QT5OpenGL_DIR | C:/QT/5.9.1/msvc2017_64/lib/cmake/Qt5OpenGL |
- Press Configure again.
- Press Generate.
- Inside the
buildfolder open the Visual Studio Solution FileOpenCV.slnwith Microsoft Visual Studio.
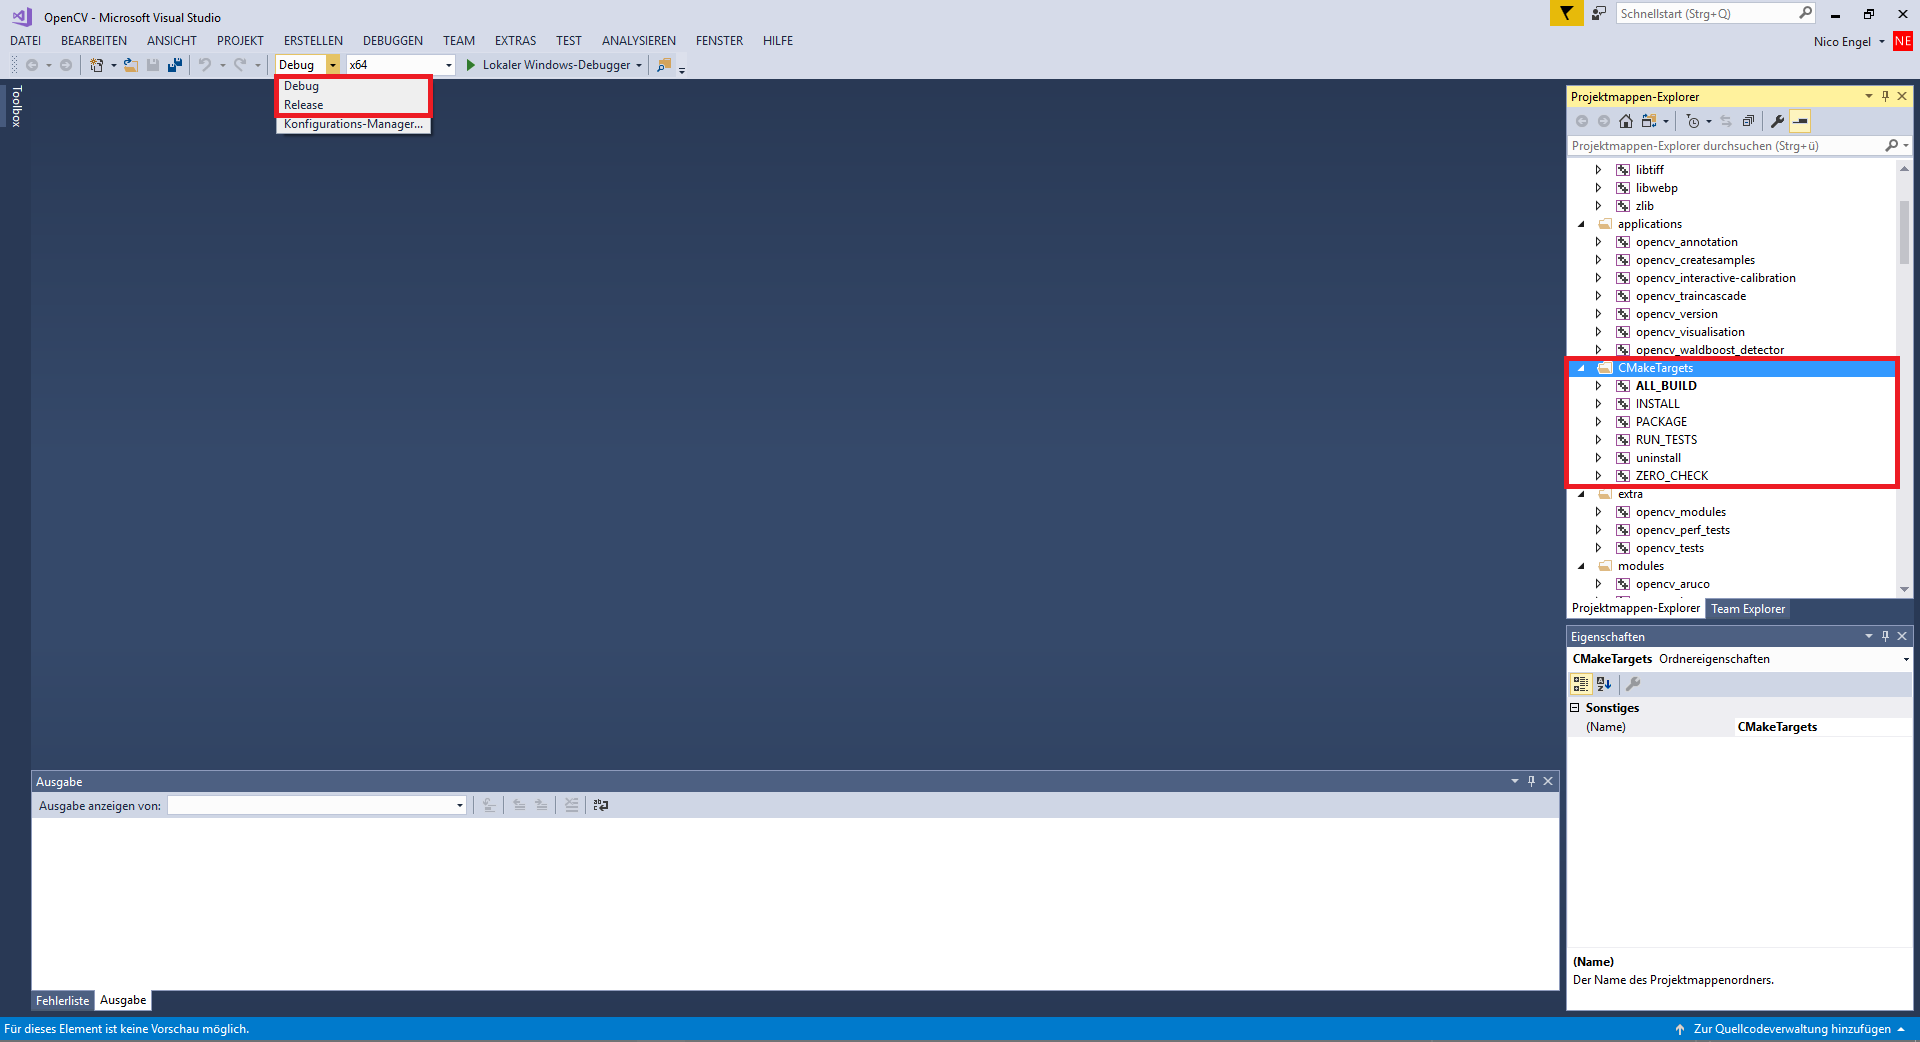
- Select the right configuration (Debug vs Release).
Tip
It is recommended that you build the Release Configuration because it is a lot faster.
Rightclick on ALL_BUILD and then build. Afterwards rightclick on INSTALL and click build again.
- Sit back and drink a coffee. This may take a while.
- If there are no errors, there should be a new
installfolder inside yourbuildfolder.
Congratulations! You build your own openCV build with additional contrib modules and QT.
1.4. Build your own ACon Sumo opencv program
1. Download ACon Sumo openCV source files. Either download the .zip file from https://github.com/gfre/sumo_opencv or checkout using Git
https://github.com/gfre/sumo_opencv.git
Note
Check if the master branch is up to date. Otherwise checkout the develop branch
- Open the Visual Studio Solution file ´´sumo_opencv.sln´´ with Microsoft Visual Studio.
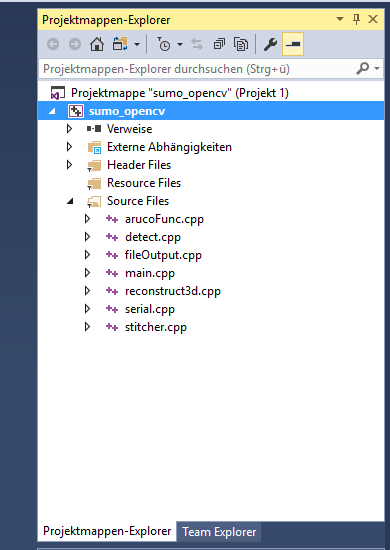
- Make sure you select the correct Configuration (Release).

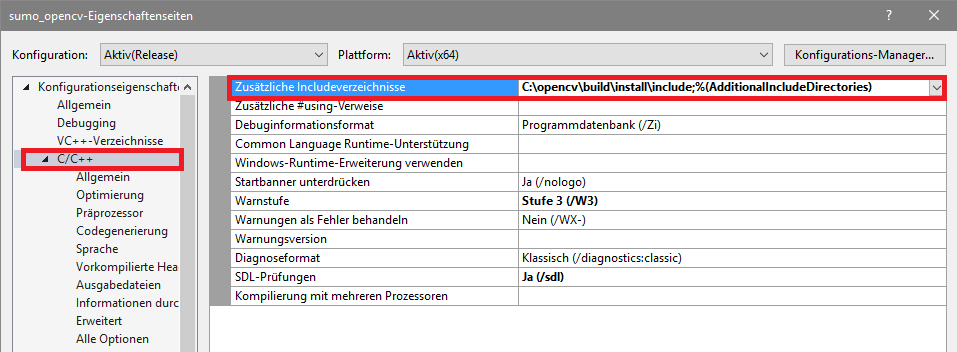
- In the Solution Explorer, rightclick on sumo_opencv and select Properties. The go to C/C++ and specify Additional Include Directories
| Name | Value |
|---|---|
| Additional Include Directories | C:\opencv\build\install\include |
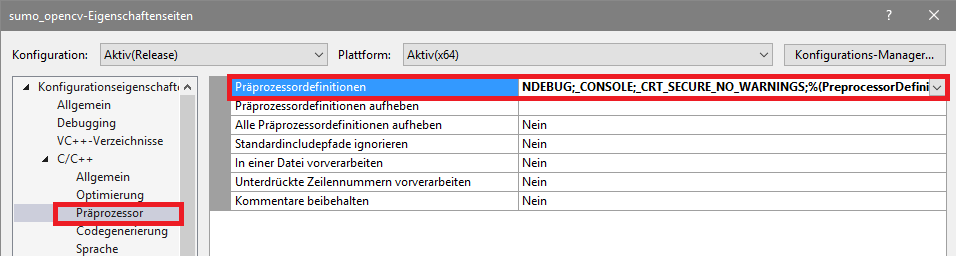
- Under Preprocessor, add the following entry
| Name | Value |
|---|---|
| Preprocessor definitions | CRT_SECURE_NO_WARNINGS |
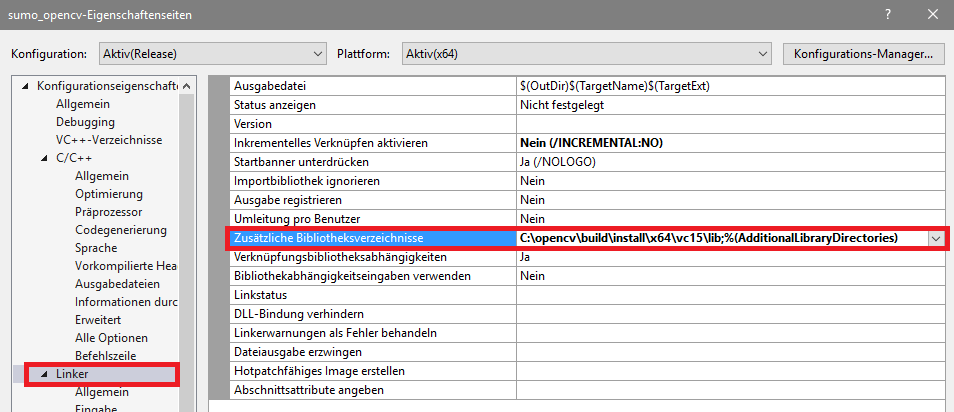
- Under Linker, add the following entry to Additional Library Directories
| Name | Value |
|---|---|
| Additional Library Directories | C:\opencv\build\install\x64\vc15\lib |
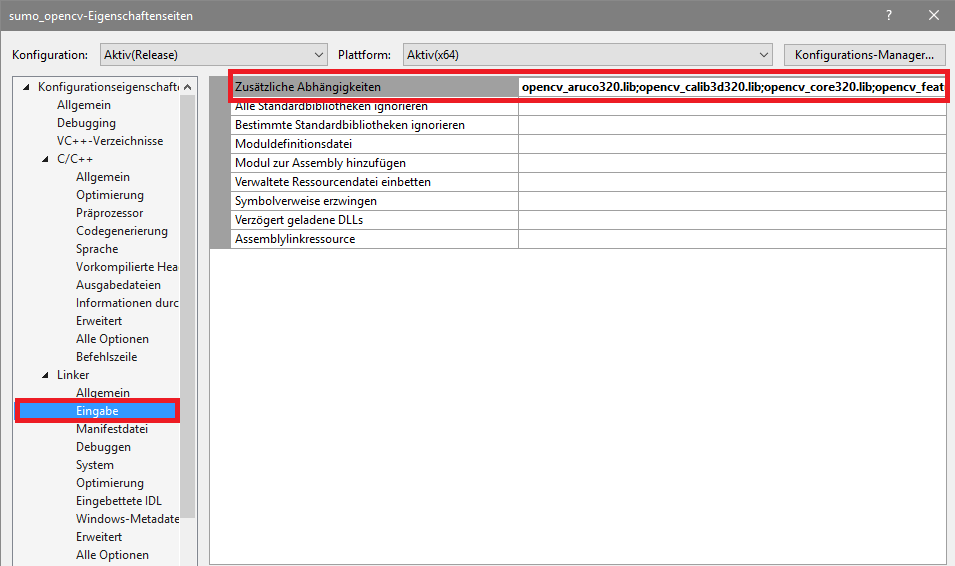
Under Input, add the following entries to Additional Dependencies:
opencv_arucoXXX.lib
opencv_calib3dXXX.lib
opencv_coreXXX.lib
opencv_features2dXXX.lib
opencv_flannXXX.lib
opencv_highguiXXX.lib
opencv_imgcodecsXXX.lib
opencv_imgprocXXX.lib
opencv_stitchingXXX.lib
opencv_videoXXX.lib
opencv_videoioXXX.lib
opencv_videostabXXX.lib
opencv_xfeatures2dXXX.lib
Note
Change XXX according to your openCV Version. For example: Version 3.2.0 it would be opencv_aruco320.lib etc. Check your C:\opencv\build\install\x64\vc15\lib folder if you are not sure.
8. Now you’re ready to go and you can build the project by either pressing Ctrl+Shift+B or by rightclicking on sumo_opencv and selection build.
You may get an error that soem .dll files cannot be found. In that case navigate to your build folder and copy all the required dll’s to your sumo_opencv project folder
Copy the dll’s:
opencv_arucoXXX.dll
opencv_calib3dXXX.dll
opencv_coreXXX.dll
opencv_features2dXXX.dll
opencv_flannXXX.dll
opencv_highguiXXX.dll
opencv_imgcodecsXXX.dll
opencv_imgprocXXX.dll
opencv_stitchingXXX.dll
opencv_videoXXX.dll
opencv_videoioXXX.dll
opencv_videostabXXX.dll
opencv_xfeatures2dXXX.dll
from
C:\opencv\build\install\x64\vc15\bin
to
sumo_opencv project folder/sumo_opencv
Additionally you need to copy the QT5 dll files:
Qt5Concurrent.dll
Qt5Core.dll
Qt5Gui.dll
Qt5OpenGl.dll
Qt5Test.dll
Qt5Widgets.dll
from
C:/QT/5.9.1/msvc2017_64/bin
to
sumo_opencv project folder/sumo_opencv
Note
It may be possible that you need additional openCV dll files. In that case just copy them too.
Note
(Optional) If you want to run the programm from an executabel file (sumo_opencv.exe), you need to copy the exact same dll files to
sumo_opencv project folder/x64/Release
or Debug respetively. Also make sure, that the camera calibration .xml file is in the x64/Relese or x64/Debug.
Camera Calibration is covered in a later chapter.
- After succesfully building the project a command prompt should open and close immediately. You’re now ready to install and connect the camera. Proceed to the next section.
1.5. Troubleshooting
- TBA -
If you’re experiencing any errors, please contact your supervisor or send me an email.